Tuesday, April 9, 2013
Wednesday, March 20, 2013
PORTRAIT STENCIL VIDEO & STEPS (Notes#3)
Finally, the video you've all been waiting for!!!
1. Choose a picture.
2. Trace shadows with a sharpie.
3. Trace and transfer onto card-stock.
4. Cut!!
5. Spray paint.
1. Choose a picture.
- choosing an image that already has a lot of contrast between the highlights and shadows, or increasing the contrast on your image of choice will make this step a LOT easier!
2. Trace shadows with a sharpie.
- make sure to include "bridges" so that the inner pieces of your face are connected to the outside (when you get to cutting, these will make it so you don't loose your face!).
3. Trace and transfer onto card-stock.
- using a pencil to trace the shadows you've outlined is important, as is making sure to place your trace paper pencil-side down onto your card-stock when you go to transfer.
4. Cut!!
- BE CAREFUL!! Move slowly so you're sure to maintain all the fun details!
5. Spray paint.
- taping your paper to the back of your stencil (or taping your stencil to a piece of paper) will ensure that the spraying won't move the stencil around.
- be sure to take any necessary safety precautions: work in a well-ventilated space (outside), wear a dust mask and gloves!
Sunday, March 17, 2013
STENCILS: ISLANDS & BRIDGES
"Islands" and "Bridges" are the two main components of a stencil - Islands cannot exist successfully WITHOUT Bridges (if you want to be able to reuse your stencil over and over). Follow the steps below to practice creating shape stencils that have Islands and Bridges.
 1. Collect the necessary supplies:
- Cutting Mat (cardboard, mat board, etc.)
- Piece of Construction Paper
- Pencil
- Eraser
- X-acto Knife
 2. Draw a basic shape:
Draw a simple shape on one-quarter of your piece of construction paper.
 3. Cut on your lines:
Using the X-acto knife, carefully cut along the line(s) you drew.
 4. Draw/trace the same shape:
So that you can see how adding "Bridges" affects a basic shape, trace the paper shape that you cut from the main piece of construction paper, draw a smaller version of your shape inside the traced shape, and add bridges.
 5. Cut on your lines:
Using the X-acto knife, carefully cut along the lines you drew, making sure not to cut across the bridges.
** you can stop here, or move on and play with more complicated shapes.
 6. Draw a complex shape:
Draw a simple shape on one-quarter of your piece of construction paper.
 7. Cut on your lines:
Using the X-acto knife, carefully cut along the lines(s) you drew.
 8. Draw/trace the same shape:
Trace the complex paper shape that you cut from the main piece of construction paper, draw a smaller version of your shape or smaller shapes inside the traced shape, and add bridges.
 9. Cut on your lines:
Using the X-acto knife, carefully cut along the lines you drew, making sure not to cut across the bridges.

- Cutting Mat (cardboard, mat board, etc.)
- Piece of Construction Paper
- Pencil
- Eraser
- X-acto Knife

Draw a simple shape on one-quarter of your piece of construction paper.

Using the X-acto knife, carefully cut along the line(s) you drew.

So that you can see how adding "Bridges" affects a basic shape, trace the paper shape that you cut from the main piece of construction paper, draw a smaller version of your shape inside the traced shape, and add bridges.

Using the X-acto knife, carefully cut along the lines you drew, making sure not to cut across the bridges.
** you can stop here, or move on and play with more complicated shapes.

Draw a simple shape on one-quarter of your piece of construction paper.

Using the X-acto knife, carefully cut along the lines(s) you drew.

Trace the complex paper shape that you cut from the main piece of construction paper, draw a smaller version of your shape or smaller shapes inside the traced shape, and add bridges.

Using the X-acto knife, carefully cut along the lines you drew, making sure not to cut across the bridges.
Glue or tape your practice stencil onto a page in your sketchbook.
Thursday, March 14, 2013
PRINTMAKING
For our exploration, experimentation and practice with PRINTMAKING, we will be using Styrofoam for our printing base/plate ... in a sense, we could name our process "Styrocuts." We will be working toward creating a 2-3 color Reduction Print (where after each layer of printing, another portion of the printing surface is carved away to print another layer of color).
Once you've planned out four options for your self-portrait design in your sketchbook, and have chosen one to use as your final composition, you may gather your supplies:
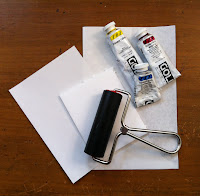
1. Collect the necessary supplies:
- Ink/paint brayer
- Paint
- Paper
- Carving tool (pencil, finger nails, anything that can press into the Styrofoam to form your design)

2. First layer of carving:
Assess your chosen design and pick out the basic shapes and lines to carve into your Styrofoam for your first layer of color.
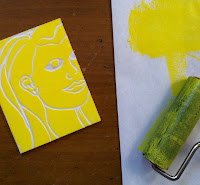 3. First paint rolling:
Using the ink/paint brayer, roll the lightest of your 2-3 colors onto the Styrofoam, making sure to completely cover the surface.
 4. First layer of your print:
Carefully center your Styrofoam (paint-coated side facing down) over your printing surface, press down, and then carefully peel the paper off the Styrofoam.
 5. Second layer of carving:
Allow your Styrofoam and print to dry, and then carve the second layer of lines/shapes.
 6. Second paint rolling:
Again, using the ink/paint brayer, roll your second color onto the Styrofoam, making sure to cover the surface.
 7. Second layer of your print:
Carefully align your Styrofoam (paint-coated side facing down) with the first color you printed, press down, and then carefully peel the paper off the Styrofoam. Notice how the first color you printed shows through where you did your second layer of carving!
**IF you've chosen to stop at 2 colors, you're done ... continue by repeating steps 5-7 again.
 8. Pressing out large areas of Styrofoam:
While you cannot see it very well in the image, large areas of the Styrofoam are pressed down so that the third color printed will only cover small parts of the final print.
 9. Third paint rolling:
Carefully roll your third color onto the Styrofoam where it is still raised, avoiding the areas where you pressed it down as best you can.
 10. Third layer of your print:
Carefully align your Styrofoam (paint-coated side facing down) with the first/second color you printed, press down, and then carefully peel the paper off the Styrofoam. Notice how the first and second colors you printed show through where you pressed down!
Once you've planned out four options for your self-portrait design in your sketchbook, and have chosen one to use as your final composition, you may gather your supplies:

1. Collect the necessary supplies:
- Ink/paint brayer
- Paint
- Paper
- Carving tool (pencil, finger nails, anything that can press into the Styrofoam to form your design)

2. First layer of carving:
Assess your chosen design and pick out the basic shapes and lines to carve into your Styrofoam for your first layer of color.

Using the ink/paint brayer, roll the lightest of your 2-3 colors onto the Styrofoam, making sure to completely cover the surface.

Carefully center your Styrofoam (paint-coated side facing down) over your printing surface, press down, and then carefully peel the paper off the Styrofoam.

Allow your Styrofoam and print to dry, and then carve the second layer of lines/shapes.

Again, using the ink/paint brayer, roll your second color onto the Styrofoam, making sure to cover the surface.

Carefully align your Styrofoam (paint-coated side facing down) with the first color you printed, press down, and then carefully peel the paper off the Styrofoam. Notice how the first color you printed shows through where you did your second layer of carving!
**IF you've chosen to stop at 2 colors, you're done ... continue by repeating steps 5-7 again.

While you cannot see it very well in the image, large areas of the Styrofoam are pressed down so that the third color printed will only cover small parts of the final print.

Carefully roll your third color onto the Styrofoam where it is still raised, avoiding the areas where you pressed it down as best you can.

Carefully align your Styrofoam (paint-coated side facing down) with the first/second color you printed, press down, and then carefully peel the paper off the Styrofoam. Notice how the first and second colors you printed show through where you pressed down!
All that's left is to date, number and sign your final print!
Subscribe to:
Posts (Atom)